
Exercise-3
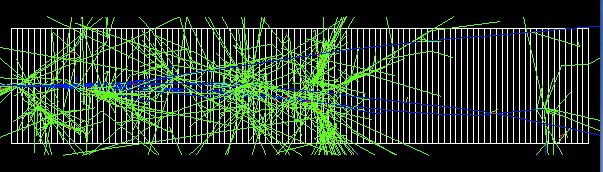
この演習では、exampleN03のサンプリングカロリメータを使って、Sensitive Detectorの記述を練習します。 ROOTを使ったヒストグラミングを行って、shower developmentの様子を調べてみましょう。 exampleN03では、SteppingActionを使って、カロリメータ内のエネルギー損失を処理しています。 しかし、大きなシステムでは、すべてのstepでSteppingActionが呼ばれるのは非効率です。 そこで、Sensitive Detectorを定義して、sensitive detector内でのみ、処理を行うようにします。
教材のダウンロード
ここから、演習コードをダウンロードし、作業ディレクトリに展開します。
$ cd ~/g4work/
$ tar zxvf (somewhere)/exercise-3.tar.gz
$ cd exercise-3
$ ls
GNUmakefile ex03.cc  gun.mac  include/  src/  vis.mac
Step1: コンパイルと実行
まずは、プログラムをコンパイルして、実行してみます。
$ make
...

$ ./bin/Linux-g++/ex03
...

ex03(Idle)[/]:/control/execute vis.mac
ここでは、exampleN03のジオメトリを元にしています。 Gapの層 Scintillator 5mm厚、Absorber層 Pb 5m厚で、50層としています。
$ cat src/ExN03DetectorConstruction.cc
...

ExN03DetectorConstruction::ExN03DetectorConstruction()
:AbsorberMaterial(0),GapMaterial(0),defaultMaterial(0),
 solidWorld(0),logicWorld(0),physiWorld(0),
 solidCalor(0),logicCalor(0),physiCalor(0),
 solidLayer(0),logicLayer(0),physiLayer(0),
 solidAbsorber(0),logicAbsorber(0),physiAbsorber(0),
 solidGap (0),logicGap (0),physiGap (0),
 magField(0)
{
	// default parameter values of the calorimeter
  AbsorberThickness =  5.*mm; // %%%%%%%%%%%%%%%%%
  GapThickness      =  5.*mm; // %%%%%%%%%%%%%%%%%
  NbOfLayers        =  50;    // %%%%%%%%%%%%%%%%%
  CalorSizeYZ       = 10.*cm;
  ComputeCalorParameters();

  // materials
  DefineMaterials();
  SetAbsorberMaterial("Lead");
  SetGapMaterial("Scintillator"); // %%%%%%%%%%%%%%
$ cat gun.mac
/gun/number 1

#/gun/particle e+
/gun/particle pi+

/gun/energy 1 GeV

/gun/position -26. 0. 0. cm

/gun/direction 1. 0.  0.
では、走らせてみます。1GeVのpi+を1,000イベント生成します。
$ ./bin/Linux-g++/ex03
...
ex03(Idle)[/]:/control/execute gun.mac
ex03(Idle)[/]:/run/beamOn 1000
ex03(Idle)[/]:exit
プログラムが終了すると、
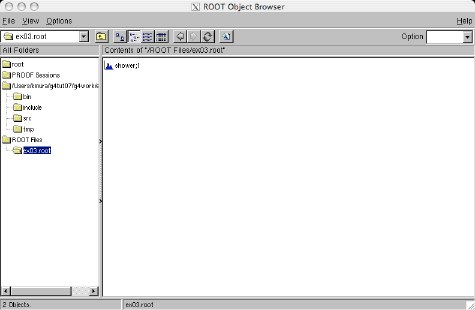
$ root
  *******************************************
  *                                         *
  *        W E L C O M E  to  R O O T       *
  *                                         *
  *   Version  5.14/00e     29 March 2007   *
  *                                         *
  *  You are welcome to visit our Web site  *
  *          http://root.cern.ch            *
  *                                         *
  *******************************************

FreeType Engine v2.1.9 used to render TrueType fonts.
Compiled on 14 May 2007 for macosx with thread support.

CINT/ROOT C/C++ Interpreter version 5.16.16, November 24, 2006
Type ? for help. Commands must be C++ statements.
Enclose multiple statements between { }.
root [0] a=TBrowser()
(class TBrowser)73356128
root [1]
Step2: Hitクラスの定義
それでは、どのように実装されているか見ていきましょう。
まずは、各Scintillator層でのエネルギー損失を記述するHitクラス(
$ cat include/CalHit.hh
#include "G4VHit.hh"
#include "G4THitsCollection.hh"
#include "G4Allocator.hh"

class CalHit : public G4VHit {
private:
  G4int id;       <-------
  G4double edep;  <-------

public:
  CalHit();
  CalHit(G4int aid, G4double aedep);
  virtual ~CalHit();

  // copy constructor & assignment operator
  CalHit(const CalHit& right);
  const CalHit& operator=(const CalHit& right);
  G4int operator==(const CalHit& right) const;

  // new/delete operators
  void* operator new(size_t);
  void operator delete(void* aHit);

  // set/get functions
  void SetID(G4int aid) { id = aid; }
  G4int GetID() const { return id; }

  void SetEdep(G4double aedep) { edep = aedep; }
  G4double GetEdep() const { return edep; }

  // methods
  virtual void Draw();
  virtual void Print();
};
さらに、Hitオブジェクトは、 イベント毎にクリア(delete)されるので、ヘタなコンパイラだとガーベジコレクションされず、 メモリリークの原因になります。そこで、Geant4ではG4Allocatorという特別なallocatorが用意されていて、 Hitクラスのnew/deleteには、このallocatorを使います。
extern G4Allocator<CalHit> CalHitAllocator;  // オブジェクトの実態は、CalHit.ccの方にある。

inline void* CalHit::operator new(size_t)
{
  void* aHit= (void*)CalHitAllocator.MallocSingle();
  return aHit;
}

inline void CalHit::operator delete(void* aHit)
{
  CalHitAllocator.FreeSingle((CalHit*) aHit);
}
ついでに、
typedef G4THitsCollection<CalHit> CalHitsCollection;
Step3: SensitiveDetectorの記述
次に、SensitiveDetector(SD)の記述をみてみます。
$ cat include/CalorimeterSD.hh
...
enum { NCHANNEL=50 };

class CalorimeterSD : public G4VSensitiveDetector {
private:
  CalHitsCollection* hitsCollection;
  G4double edepbuf[NCHANNEL]; // buffer for energy deposit <---

public:
  CalorimeterSD(const G4String& name);
  virtual ~CalorimeterSD();

  // virtual methods
  virtual G4bool ProcessHits(G4Step* aStep, G4TouchableHistory* ROhist);
  virtual void Initialize(G4HCofThisEvent* HCTE);
  virtual void EndOfEvent(G4HCofThisEvent* HCTE);

  virtual void DrawAll();
  virtual void PrintAll();

};
では、実装の中身(
//////////////////////////////////////////////////
CalorimeterSD::CalorimeterSD(const G4String& name)
  : G4VSensitiveDetector(name)
//////////////////////////////////////////////////
{
  collectionName.insert("calorimeter");
}
/////////////////////////////////////////////////////
void CalorimeterSD::Initialize(G4HCofThisEvent* HCTE)
/////////////////////////////////////////////////////
{
  // create hit collection(s)
  hitsCollection= new CalHitsCollection(SensitiveDetectorName,
                                        collectionName[0]);

  // push H.C. to "Hit Collection of This Event"
  G4int hcid= GetCollectionID(0);
  HCTE-> AddHitsCollection(hcid, hitsCollection);

  // clear energy deposit buffer
  for (G4int i=0; i<NCHANNEL; i++) edepbuf[i]=0.;
}
続いて、
///////////////////////////////////////////////////////
G4bool CalorimeterSD::ProcessHits(G4Step* astep,
                                  G4TouchableHistory* )
///////////////////////////////////////////////////////
{
  // get step information from "PreStepPoint"
  const G4StepPoint* preStepPoint= astep-> GetPreStepPoint();
  G4TouchableHistory* touchable=
    (G4TouchableHistory*)(preStepPoint-> GetTouchable());

  // accumulate energy deposit in each scintillator
  G4int id= touchable-> GetReplicaNumber(1);
  edepbuf[id]+= astep-> GetTotalEnergyDeposit();

  return true;
}
/////////////////////////////////////////////////
void CalorimeterSD::EndOfEvent(G4HCofThisEvent* )
/////////////////////////////////////////////////
{
  // make hits and push them to "Hit Coleltion"
  for (G4int id=0; id< NCHANNEL; id++) {
    if(edepbuf[id] > 0. ) {
      CalHit* ahit= new CalHit(id, edepbuf[id]);
      hitsCollection-> insert(ahit);
    }
  }
}
最後に、このSDのオブジェクトを対応するLogical Volumeに登録します。
  // %%%%%%%%%%%%%%%%%%%%%%%%%%%%%%%%%%%%%%%%%%%%%%%%%%%%%%%%%%%%%%
  // define senstive detector
  G4SDManager* SDmanager= G4SDManager::GetSDMpointer();
  CalorimeterSD* calsd= new CalorimeterSD("/calorimeter");
  SDmanager-> AddNewDetector(calsd);
  logicGap-> SetSensitiveDetector(calsd);
  // %%%%%%%%%%%%%%%%%%%%%%%%%%%%%%%%%%%%%%%%%%%%%%%%%%%%%%%%%%%%%%
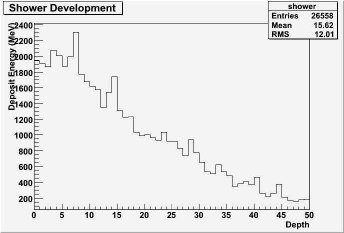
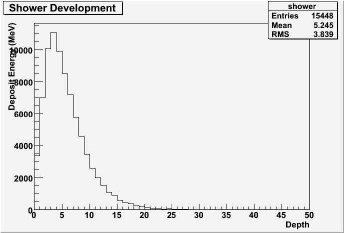
Step4: ヒストグラミングの実行
最後にROOTを使ったヒストグラミングです。
- ここでは、
RunAction クラスのコンストラクタで、 ヒストグラムを定義します。 RunAction::BeginOfRunAction() で、 ヒストグラムをクリアします。EventAction::EndOfEventAction() で、 Hit Collection of This Eventに入っているHit情報をとってきて、 ヒストグラムをフィルします。- 最後に、
RunAction::EndOfRunAction() で、 ROOTファイルを作成して、ヒストグラムオブジェクトを書出します。
//////////////////////////////////////////////////////////
void EventAction::EndOfEventAction(const G4Event* anEvent)
//////////////////////////////////////////////////////////
{
  G4SDManager* SDManager= G4SDManager::GetSDMpointer();

  // get "Hit Collection of This Event"
  G4HCofThisEvent* HCTE= anEvent-> GetHCofThisEvent();
  if(! HCTE) return;

  // get a hit collection
  static G4int idcal= -1;
  if(idcal<0)  idcal= SDManager-> GetCollectionID("calorimeter");
  CalHitsCollection* hccal= (CalHitsCollection*)HCTE-> GetHC(idcal);
  if (!hccal) return; // no hit collection

  // get hits
  G4int nhits= hccal-> entries();
  for(G4int idx=0; idx< nhits; idx++) {
    G4int ich= (*hccal)[idx]-> GetID();
    G4double edep= (*hccal)[idx]-> GetEdep();

    // fill a histogram
    TH1D* hist_shower= (TH1D*)gROOT-> FindObject("shower");
    hist_shower-> Fill(ich, edep/MeV);
  }
}